Overview
Each Hall of Fame Online interactive station consists of a large, audio-enabled, wide-format touchscreen powered by a Windows® PC and configured to run the Hall of Fame Online![]() application. Each touchscreen can be wall or pedestal mounted. Modules that support non-interactive features, such as the Slideshow module, can be displayed on standard, non-touch enabled screens.
application. Each touchscreen can be wall or pedestal mounted. Modules that support non-interactive features, such as the Slideshow module, can be displayed on standard, non-touch enabled screens.
A Hall of Fame Online user with INTERACTIVE ONLY access rights is required to run the Hall of Fame Online Application. Use the INTERACTIVE ONLY user that was auto-generated at sign-up and referenced in the welcome e-mail, or see Creating Users under the Editor Users topic to learn how to create a new Hall of Fame Online user with the INTERACTIVE ONLY access level.
IMPORTANT: The following procedures may vary depending on the specific version of Windows. Please check with your System Administrator as needed before making changes to your system.
Each interactive station (kiosk) must connect to the service using a Windows PC running the Hall of Fame Online Application. Connected PCs will be listed in the Devices section, under Settings.
Update Windows and All Hardware Drivers
Prior to installing the Hall of Fame Online Application, ensure that Windows and all hardware drivers are up to date. Windows 10 must be updated to version 1809 or higher.
Install the Hall of Fame Online Application
Windows Desktop Version Installation
Windows Kiosk Mode Version Installation
WINDOWS DESKTOP VERSION INSTALLATION
1. Log in to Windows with an Administrator account
2. Open a web browser and navigate to https://halloffame.online/install/
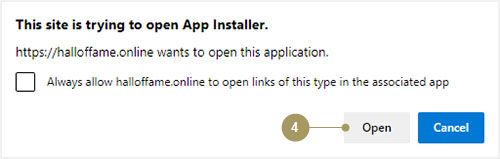
3. Under Windows Desktop Installer, click the get the app link and then the Get the app button:
7. If you are running Windows 10 version1909 or below the installation may fail unless Developer Mode is enabled. It is recommended that Windows be updated to the latest version. If this is not possible Developer Mode must be enabled by opening Windows Start -> Settings -> Update & Security -> For developers (or search Developer Settings) and under Use developer features select Sideload apps (or under Developer Mode and Install apps from any source, depending on the version of Windows). Run the installer again after enabling Developer Mode.
8. To prevent interruptions to end-users, turn off Windows automatic updates (updates can still be installed manually when convenient):
a. Type services in Windows Type here to search field (next to Start)
b. Click the Services App (or View Local Services)
.png)
.png)
d. Double-click the Windows Update service and change the startup type to Disabled and click OK
.png)
Configure Windows Power and Sleep
9. Configure Windows Power and Sleep by clicking on Windows Start ![]() then Settings
then Settings ![]() then System
then System ![]() and then Power & Sleep
and then Power & Sleep ![]()
a.Under Screen set When plugged in, turn off after to Never. See the Sleep/Wake Timer section under Settings for configuration details if the application's power management settings will be used . The application's power management settings will override Windows Power and Sleep settings.
b.Under Sleep set When plugged in, PC goes to sleep after to Never:
.png)
Disable Edge Swiping
IMPORTANT: Edge swiping must be disabled to prevent end users from exiting the application and gaining access to the desktop.
a.Open the Local Group Policy Editor (type group policy editor into the Windows Search Bar to locate the editor. See the instructions below if there is no group policy editor)
a.In the left pane, navigate to User Configuration->Administrative Templates->Windows Components->EdgeUI
b.In the right pane, double-click Allow edge swipe, select Disabled in the window that opens, and click OK to save the changes
c.Sign out and back in to Windows, or restart the computer to apply the change
.png)
If your version of Windows does not include the Local Group Policy Editor, you can disable edge swiping by editing the Windows Registry:
a.Open the Windows Registry Editor (type the name into the Windows Search Bar)
a.In the left pane, navigate to HKEY_LOCAL_MACHINE\SOFTWARE\Policies\Microsoft\Windows\EdgeUI
a.In the right pane, double-click AllowEdgeSwipe and change the value to 0
.png)
Create a Standard Windows User
To improve security it is recommended that a Standard Windows User be created and used to log in to the PC that will be used to run the interactive. To create a Standard Windows User:
1. Open Windows Settings ![]() (Windows Logo Key + i)
(Windows Logo Key + i)
2. Click on Accounts
.png)
3. Click on Family & other users.png)
4. Below the Other Users section heading, click Add someone else to this PC.png)
5. On the window that opens, click the I don't have this person's sign-in information link![]()
6. On the window that opens, click the Add a user without a Microsoft account link![]()
7. On the window that opens, enter a user name, password, answers to security questions, and click Next to finish creating the new user
.png)
1. Type cmd into the Windows Search Box
![]()
2. Right-click on Command Prompt and select Run as administrator
.png)
3. In the command prompt window type net user yourdesiredusername yoursecurepassword and press Enter
(replace yourdesiredusername and yoursecurepassword in the example above with the desired username and password and make sure the password is entered correctly as it is only entered once)
.png)
4. If successful the message The command completed successfully will be displayed and the new user will be listed along side other users under Windows Settings
1. Type netplwiz into the Windows search box
![]()
2. Right-click on netplwiz and select Run as administrator
.png)
3. On the window that opens, select the Standard User created in the previous step, uncheck the Users must enter a user name and password to use this computer checkbox and click OK
(see the note below if this checkbox is missing)
.png)
.png)
5. Restart the computer to complete the new Standard Windows User setup
6. After completing these steps the interactive will load automatically each time the PC is powered on or restarted. Continue with the configuration as outlined under Accessing the Interactive: Login and Station Assignment below.
NOTE:
If the 'Users must enter a user name and password to use this computer' checkbox in step 3 is missing, go to Settings->Accounts->Sign-in options, turn off 'Require Windows Hello sign-in for Microsoft accounts' then restart the computer and repeat the steps:
.png)
WINDOWS KIOSK MODE VERSION INSTALLATION
This version runs in Windows Kiosk Mode which is available on Windows 10 or 11 Pro, Enterprise and Education editions. It runs in an isolated sandbox and because it has limited access to system resources not all features are supported, including the Power Management and Holographic Display features. This option can be used when a higher level of security is required and alternate power management methods are available.
1. Log in to Windows with an Administrator account
2. Open a web browser and navigate to https://halloffame.online/install/
3. Under Windows Kiosk Mode Installer, click the get the app link and then the Get the app button:
5. Uncheck the Launch when ready checkbox (if this step is missed, press ALT + F4 on the keyboard to exit the application following installation)
6. Click the Install button
3. Click Family & other users in the left pane:
4. Scroll down in the right panel and click Assigned access under Set up a kiosk:
6. Give your kiosk a name
7. Click the Next button:
8. Select Hall of Fame Online under Choose a kiosk app:
9. Click the Next button:
12. Under Screen set When plugged in, turn off after to Never:
13. Under Sleep set When plugged in, PC goes to sleep after to Never:
Accessing the Interactive: Login and Station Assignment
Once installed and configured, running the interactive on each kiosk is a two step process, including (1) logging in and (2) assigning a station configuration.
The Hall of Fame Online login screen will be displayed the first time the application is run. To log in:
1. Touch or click the Username field and enter your username. A Hall of Fame Online user with INTERACTIVE ONLY access rights must be used. See Creating Users for information on how to create a user with the INTERACTIVE ONLY access level.
2. Touch or click the Password field and enter your password. If using the virtual keyboard, touch or click the Accept key, then click the Login button.
3. After logging in the Station Assignment screen will be displayed. Select an available Station Configuration to assign to the device and click the Assign Station to Device button. If a station configuration was previously assigned to the device it will be labeled as the default configuration. Multiple station configurations can be created with identical settings, but each station configuration can only be assigned to a single device. A station configuration already assigned to another device will be labeled as unavailable.
4. The Hall of Fame Online splash screen will be displayed momentarily while the interactive loads.
Change a Device Station Assignment
Station assignments can be changed using the Editor or the device itself. To assign a different station configuration using the device, connect a physical keyboard and press SHIFT + CTRL + ALT + X , select Log Out from the menu, and then select the desired station configuration after logging back in. To assign a different station using the Editor, see the Devices section under Settings. See the note below if Kiosk Mode is enabled.
Exiting the Hall of Fame Online Application
To exit the application press ALT + F4 on the keyboard.
NOTE: If Kiosk Mode has been enabled under Settings the application will exit to a blank screen. To prevent this, Kiosk Mode can be disabled under settings before exiting the application, otherwise a keyboard will be required to restart Windows Explorer as follows:
To restart Windows Explorer press CTRL + ALT + DELETE on the keyboard and select Task Manager. In Task Manager, click the File menu item, then Run New Task, type explorer.exe in the Open: input field and click OK.
HARDWARE REQUIREMENTS
Minimum PC Specifications:
Processor: Intel Core i5-7500T
Graphics: Intel UHD 630 Graphics
RAM: 8GB
Hard Drive: 128 GB (Solid State Recommended)
OS: Windows 10 or above
Touchscreen:
Size: 32″ – 43″ Recommended
Aspect Ratio: 16:9
Resolution: 1920 x 1080 Recommended (1080p/Full HD)
Recommended Touch Interface (choose one):
PCAP (Projected Capacitive)
SAW (Surface Acoustic Wave)
IR (Infrared)
High Speed Internet Access over wired (recommended) or wireless LAN
NOTES:
System demands may increase over time as the application evolves and as the volume and complexity of content increases. As a general rule, and in an effort to future proof an installation for as long as possible, it is recommended that the most powerful hardware be purchased as a given budget will allow.
Although not recommended when user interaction is required, the application can be used without a touchscreen. The display of the mouse cursor can be toggled on or off by pressing CTRL+C on the keyboard, or by selecting the option to display the cursor under each station's configuration under Settings in the Hall of Fame Online Editor.
.png)
.png)
.png)
.png)
.png)

(1).png)


.png)
.png)
.png)
.png)
.png)